Sharing notes from my ongoing learning journey — what I build, break and understand along the way.
Getting Started with SQL: A Step-by-Step Guide Using DB Browser for SQLite
SQL Tutorial for Beginners: Learn Database Basics with DB Browser for SQLite
The concept of a database is one of the most fundamental ideas in the software world.
But many beginners don’t know where to start with SQL.
In this post, we’ll use DB Browser for SQLite to create a simple database from scratch.
Even if you’ve never written a single SQL command before, you’ll be able to follow along easily — every step and concept is explained in plain language.
Before You Begin: Installing DB Browser for SQLite
In this tutorial, we’ll use a free and beginner-friendly tool called DB Browser for SQLite.
It works on Windows, macOS, and Linux.
You can download it from https://sqlitebrowser.org.
Once you open the program, switch to the Execute SQL tab in the top menu — this is where we’ll type and run our SQL commands.
Step 1 – What Does the CREATE Command Do?
In SQL, the CREATE command is used to create a new object in your database.
That object can be a table, a view, or an index.
For beginners, the most common one is CREATE TABLE, which means:
“Hey database, please create a new table to store my data.”
Step 2 – The Structure of a CREATE TABLE Statement
When you create a table, you define its name, the columns it will have, and what type of data each column will store.
Here’s the general form:
CREATE TABLE table_name (
  column_name1 data_type constraint,
  column_name2 data_type constraint,
  ...
);
Each line inside the parentheses defines one column — what kind of data it holds and what rules apply.
| Part | Meaning | Example |
|---|---|---|
| table_name | The name of your new table | students |
| column_name | The field name inside the table | id, name, age |
| data_type | The kind of value stored | INTEGER, FLOAT, VARCHAR |
| constraint | Optional rule or restriction | PRIMARY KEY, NOT NULL, UNIQUE |
Step 3 – Data Types in SQL
SQLite and MySQL share many of the same data type concepts.
Here are a few common ones you’ll use most often:
| Data Type | Description | Example |
|---|---|---|
INT | Whole numbers | 1, 25, 100 |
FLOAT | Decimal numbers | 88.5, 91.0 |
VARCHAR(50) | Short text, up to 50 characters | ‘Alice’ |
TEXT | Longer text content | ‘A very long note…’ |
Note: In SQLite, the
(50)part ofVARCHAR(50)isn’t strictly enforced —
but in MySQL, it limits the number of characters allowed.
In this tutorial, we’ll stick with MySQL-style syntax for clarity.
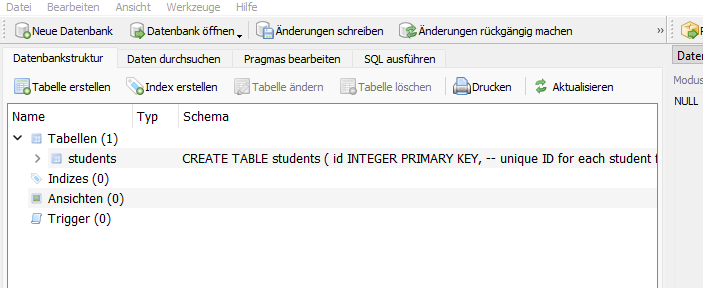
Step 4 – Creating Our First Table
Let’s create a simple table called students.
It will hold basic student information: first name, last name, age, grade, and email.
Open SQL ausführen (Execute SQL) in DB Browser, and run the following command:
CREATE TABLE students (
  id INTEGER PRIMARY KEY AUTOINCREMENT,
  first_name VARCHAR(50) NOT NULL,
  last_name  VARCHAR(50) NOT NULL,
  age INT,
  grade FLOAT,
  email VARCHAR(100) UNIQUE
);
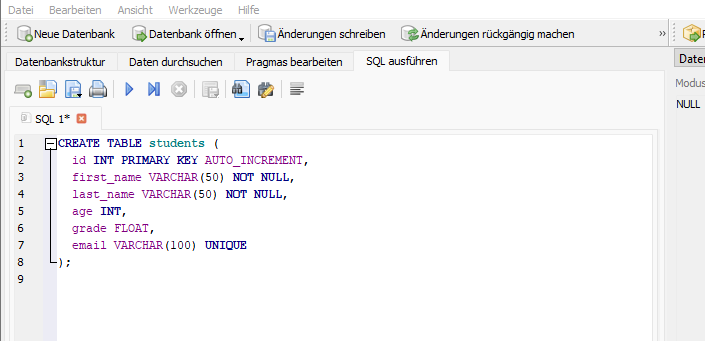
Here’s what each part means:
CREATE TABLE students→ creates a new table namedstudents.id INTEGER PRIMARY KEY AUTOINCREMENT→ automatically increases the student ID for each new record.VARCHAR(50)→ used for short text fields.NOT NULL→ the value cannot be empty.FLOAT→ stores decimal numbers (like 92.5).UNIQUE→ ensures no duplicate email addresses are allowed.
INTEGER PRIMARY KEY vs AUTOINCREMENT (SQLite)
In SQLite, when you define a column as INTEGER PRIMARY KEY, it already behaves like an auto-incrementing ID.
That means SQLite automatically assigns values 1, 2, 3… as you insert new rows.
So what’s the difference?
INTEGER PRIMARY KEY→ IDs increase automatically, but deleted numbers might be reused later.INTEGER PRIMARY KEY AUTOINCREMENT→ IDs always move forward and are never reused, even if rows are deleted.
For most projects, INTEGER PRIMARY KEY is enough.
If you want absolute uniqueness and never reuse IDs, use AUTOINCREMENT.
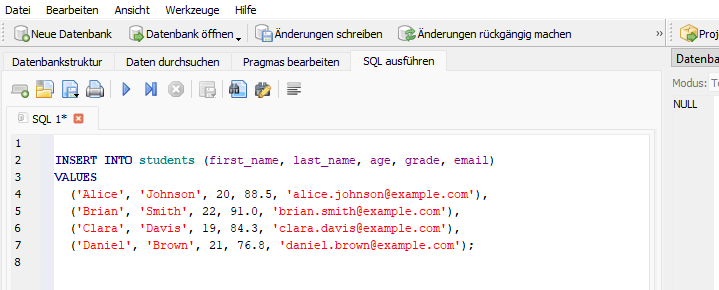
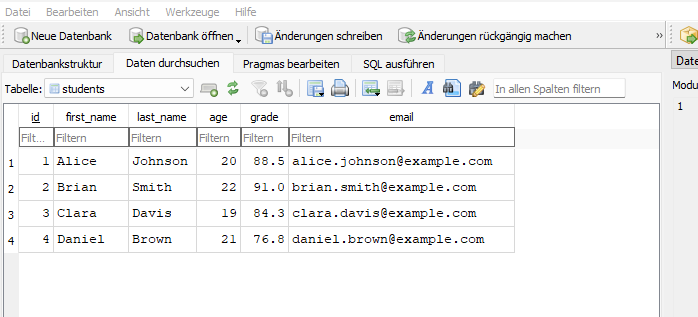
Step 5 – Inserting Data (INSERT INTO)
Now that the table exists, let’s add some rows to it using INSERT INTO.
The general syntax looks like this:
INSERT INTO table_name (column1, column2, ...)
VALUES (value1, value2, ...);
- Numbers (
INT,FLOAT) are written without quotes:20,91.0. - Text (
VARCHAR,TEXT) must be written inside quotes:'Alice'. - You can use either single
' 'or double" "quotes,
but it’s best to stick with single quotes in SQLite to avoid confusion. - Each set of parentheses
( ... )represents one row, separated by commas.
Here’s an example:
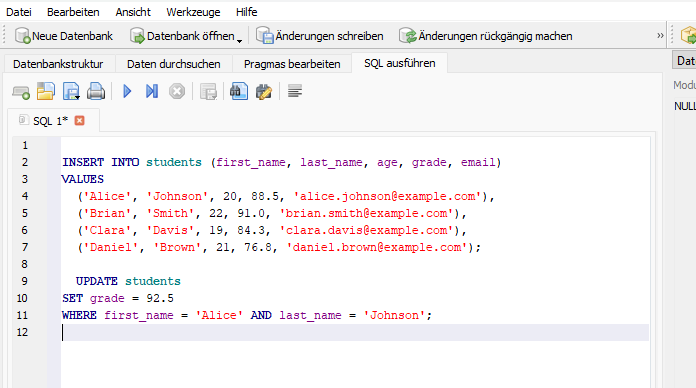
INSERT INTO students (first_name, last_name, age, grade, email)
VALUES
  ('Alice', 'Johnson', 20, 88.5, 'alice.johnson@example.com'),
  ('Brian', 'Smith',   22, 91.0, 'brian.smith@example.com'),
  ('Clara', 'Davis',   19, 84.3, 'clara.davis@example.com'),
  ('Daniel','Brown',   21, 76.8, 'daniel.brown@example.com');
- The order of columns and values must match.
UNIQUE (email)ensures each email can only appear once.- You don’t need to specify the
idcolumn — it’s auto-incremented automatically.
Step 6 – Updating Data (UPDATE)
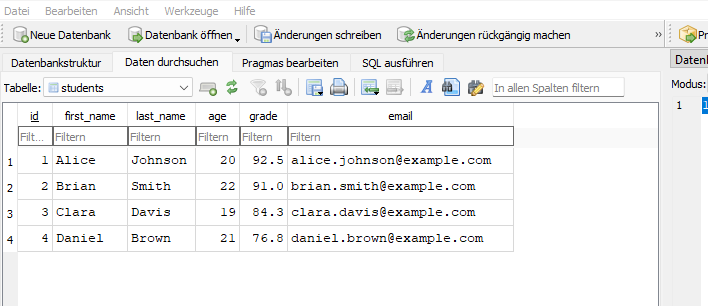
When a student’s grade changes, you can modify that record with the UPDATE command.
UPDATE students
SET grade = 92.5
WHERE first_name = 'Alice' AND last_name = 'Johnson';
UPDATE→ tells the database which table to modify.SET→ defines what to change.WHERE→ limits the update to specific rows (otherwise, it changes everything).
You can also update multiple columns at once:
UPDATE students
SET grade = 90.0, age = age + 1
WHERE id = 2;
Step 7 – Deleting Data (DELETE)
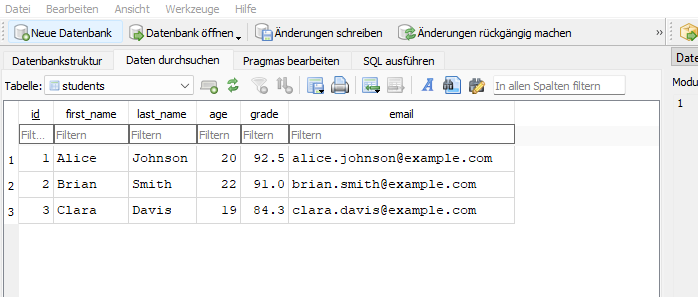
To completely remove a record, use the DELETE command.
Be careful — if you forget the WHERE clause, you’ll erase every record in the table.
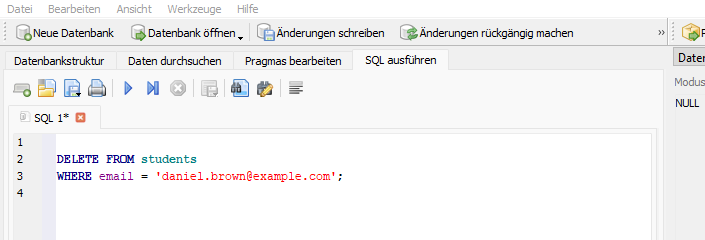
DELETE FROM students
WHERE email = 'daniel.brown@example.com';
DELETE FROM→ specifies which table you’re deleting from.WHERE→ identifies which row(s) to remove.
Pro tip:
Before deleting, run a SELECT with the same condition to double-check what will be removed.
SELECT * FROM students WHERE email = 'daniel.brown@example.com';
In Short
At this point, you’ve learned the essential SQL building blocks:
- CREATE TABLE → build a table
- INSERT INTO → add data
- UPDATE → modify data
- DELETE → remove data
These four commands make up the CRUD cycle — Create, Read, Update, Delete —
the foundation of every database system.