Sharing notes from my ongoing learning journey — what I build, break and understand along the way.
Building a Two-Domain Enterprise Network Infrastructure with Samba AD, LDAP, NFS and DMZ
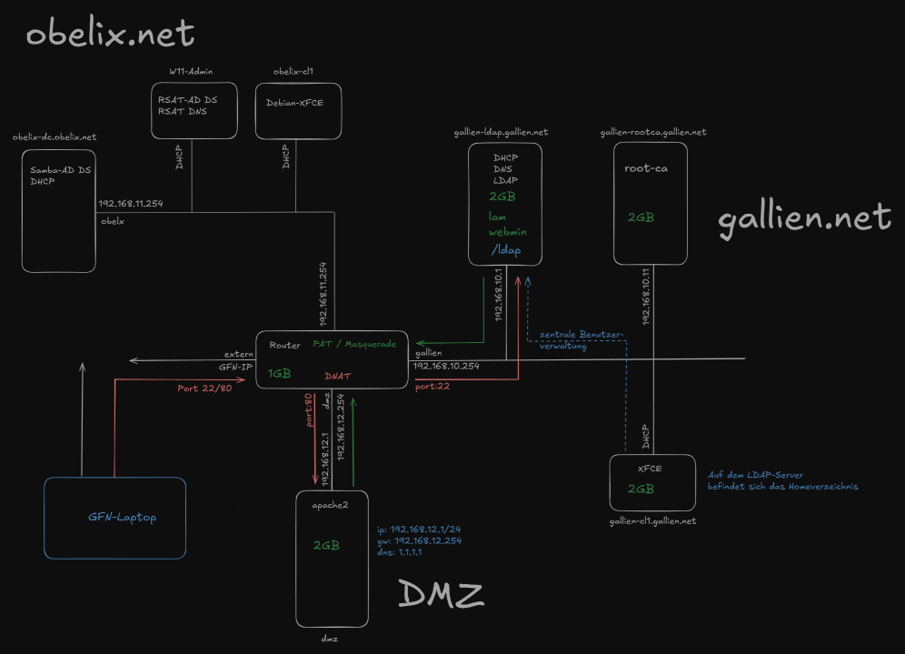
A Complete Enterprise Network Lab with obelix.net and gallien.net
In this article, I will explain how I built a network infrastructure project from start to finish as part of our training. The goal of the project was to connect two separate domain structures through a central router, run Linux- and Windows-based services together, provide external access through a DMZ, and centralize user management.
The structure consists of three main network segments:
- obelix.net: Windows/Samba Active Directory domain structure
- gallien.net: Linux-based LDAP, DNS, DHCP, and NFS infrastructure
- DMZ: Externally accessible Apache2 web server
These three network segments were connected through a Debian-based router. NAT/PAT was configured on the router to allow the internal networks to access the internet, and DNAT was used to forward incoming HTTP/HTTPS and SSH requests from the external network to the relevant internal servers.
In this article, I will describe the system in the same order in which I built it. This way, we will see not only what was installed, but also why it was configured that way.
General Topology
Before starting the project, it was important to clearly define the network topology. In this type of setup, even a small IP or gateway mistake can prevent the next services from working properly.
The topology includes a central router. This router has four different network connections:
- External network / GFN network
- gallien.net network:
192.168.10.0/24 - obelix.net network:
192.168.11.0/24 - DMZ network:
192.168.12.0/24
The router acts as the gateway in each network segment:
- gallien.net gateway:
192.168.10.254 - obelix.net gateway:
192.168.11.254 - DMZ gateway:
192.168.12.254
This allows each network to remain separated internally, while still being able to reach the other networks and the outside world through the router when needed.
1. Router Installation
The first machine I set up in the project was the router. The reason for this was that the router needed to be ready before the other machines could access the internet and communicate between networks.
We used a Debian-based virtual machine as the router. The router’s role was not limited to simply forwarding packets. It also handled NAT, DNAT, and routing between the network segments.
The router had four network interfaces:
eth0: external network / GFN connectioneth1: gallien.net networketh2: obelix.net networketh3: DMZ network
As the first step, we connected the router’s network cards to the correct switches. In Hyper-V, we used one external switch and three private switches for this. The external switch was used for the outside connection, while the private switches were used to isolate the gallien, obelix, and DMZ networks from each other.
One of the basic settings we configured on the router was enabling IP forwarding. By default, Linux systems do not behave like routers. In other words, they do not forward packets from one interface to another. To change this, we enabled the following line in the /etc/sysctl.conf file:
- net.ipv4.ip_forward=1
With this setting, the Debian machine started working like a real router.
After that, we checked the router’s IP addresses.
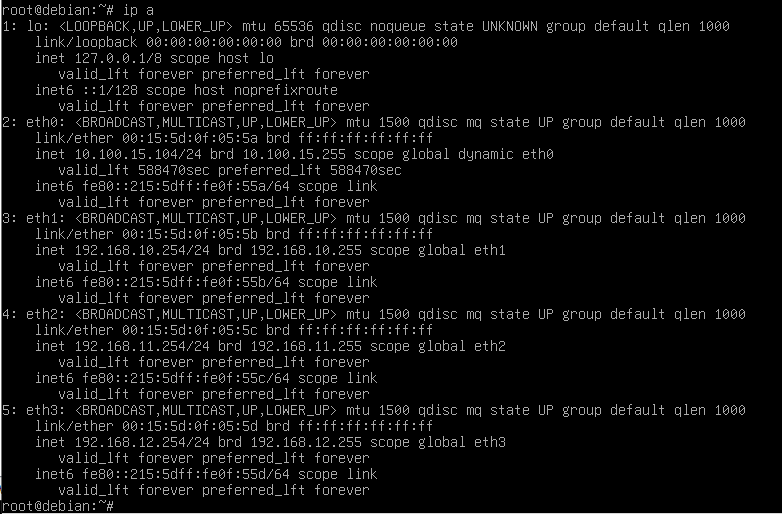
At this stage, it was very important to make sure the router’s network cards were connected to the correct switches. For example, if the card that should be connected to the gallien switch is accidentally connected to the DMZ switch, the IP may look correct, but clients will not be able to reach the gateway.
NAT and DNAT on the Router
The router’s second important role was NAT and DNAT.
Thanks to NAT/PAT, machines in the internal networks can access the outside world using the router’s external IP address. For this, we used iptables. The NAT rule was generally as follows:
- iptables -t nat -A POSTROUTING -o eth0 -j MASQUERADE
This rule changes the source address of packets coming from the internal networks and going out to the internet through the external interface eth0 to the router’s external IP address. This allows machines inside gallien.net, obelix.net, and the DMZ to access the internet.
On the DNAT side, we forwarded specific incoming ports from the outside to specific servers inside the internal networks:
- External IP port 80 → DMZ web server
192.168.12.1:80 - External IP port 443 → DMZ web server
192.168.12.1:443 - External IP port 22 → gallien LDAP server
192.168.10.1:22
With this structure, we were able to access the web server from the external network using HTTP/HTTPS. In addition, when connecting to the router’s external IP via SSH, the connection was forwarded through DNAT to the gallien-ldap machine.

2. gallien.net Infrastructure
After the router was ready, we moved on to the Linux-based gallien.net network. At the center of this network is the server named gallien-ldap.gallien.net.
This server has multiple roles:
- DHCP Server
- DNS Server
- LDAP Server
- NFS Server
- Central user management
2.1 gallien-ldap Installation
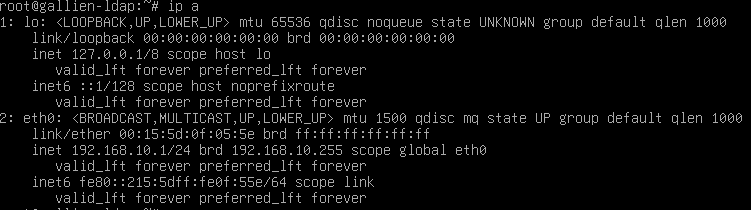
We assigned the static IP address 192.168.10.1 to the gallien-ldap machine. As the gateway, we used the router’s gallien interface: 192.168.10.254.
Because this machine is the central server of gallien.net, its IP address must remain static. Services such as DHCP, DNS, and LDAP are constantly used by clients, so this server’s IP address should not change.
2.2 DHCP Server Installation
To allow clients inside gallien.net to receive IP addresses automatically, we installed isc-dhcp-server.
Installed package:
- isc-dhcp-server
A DHCP service does not only assign IP addresses to clients. It also provides gateway, DNS server, and domain suffix information. Therefore, the DHCP configuration included the following information:
- IP range:
192.168.10.100 - 192.168.10.200 - Gateway:
192.168.10.254 - Domain:
gallien.net - DNS server:
192.168.10.1
With this configuration, a client connected to the gallien.net network automatically received the correct IP address, gateway, and DNS settings.

2.3 DNS Server Installation
For DNS service in gallien.net, we used Bind9.
Installed packages:
- bind9
- bind9utils
- dnsutils
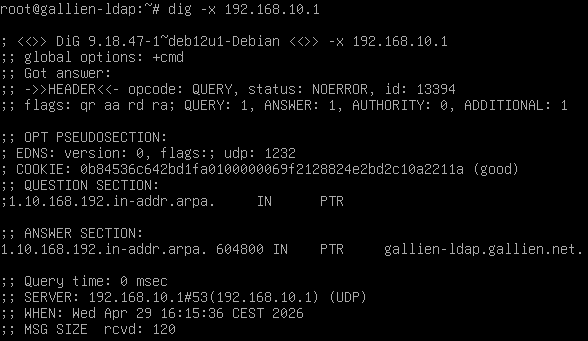
On the DNS side, we created two zones:
- Forward zone:
gallien.net - Reverse zone:
10.168.192.in-addr.arpa
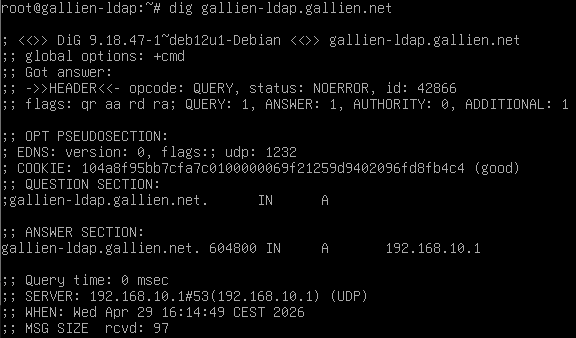
The forward zone resolves names to IP addresses. For example:
- gallien-ldap.gallien.net → 192.168.10.1
The reverse zone resolves IP addresses to hostnames. For example:
- 192.168.10.1 → gallien-ldap.gallien.net
This two-way DNS resolution creates a healthy infrastructure, especially for LDAP, NFS, and other network services.
One important point during DNS configuration was that if the system uses an external DNS server such as 1.1.1.1, it cannot resolve its own local records. For this reason, the gallien-ldap machine was configured to use its own DNS server, 192.168.10.1, in the /etc/resolv.conf file.
2.4 LDAP Server Installation
On the gallien.net side, we used OpenLDAP for central user management.
Installed packages:
- slapd
- ldap-utils
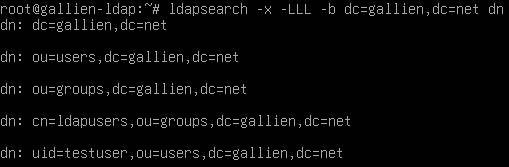
During LDAP installation, the domain structure was created as:
- dc=gallien,dc=net
After that, we created two basic Organizational Units inside LDAP:
ou=usersou=groups
This structure was used to separate user and group objects in an organized way. Then, we created a test user and group:
- Group:
ldapusers - User:
testuser
We assigned this user a password through LDAP and used it for login tests on the client side.
LDAP played a very important role in this project. User information was no longer stored separately on every client. Instead, it was stored centrally on the LDAP server. Clients queried user information through LDAP.
3. gallien-cl1 Linux Client
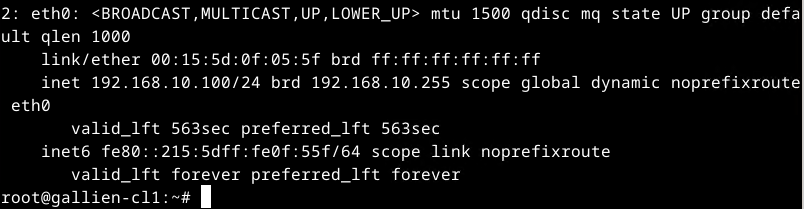
As the client on the gallien.net side, we installed gallien-cl1. This machine was a Debian XFCE-based Linux client.
The machine received its IP address through DHCP. The information received from DHCP was:
- IP address:
192.168.10.x - Gateway:
192.168.10.254 - DNS:
192.168.10.1 - Search domain:
gallien.net
LDAP Client Integration
On gallien-cl1, we configured NSS and PAM so that LDAP users could be seen as system users.
Installed packages:
- libnss-ldap
- libpam-ldap
- ldap-utils
- nscd
The roles of these packages are briefly as follows:
libnss-ldap: Allows LDAP to be used as a source for system user and group lookups.libpam-ldap: Uses LDAP authentication during login processes.ldap-utils: Provides LDAP testing and query tools.nscd: Name Service Cache Daemon; improves performance by caching user and group queries.
In /etc/nsswitch.conf, LDAP was added to the passwd, group, and shadow lines. This allowed the system to query LDAP in addition to local user files.
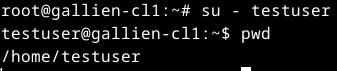
We used the following command for testing:
- getent passwd testuser

Then we performed a login test:
- su – testuser
- pwd
4. Central Home Directory with NFS
One of the important goals of the project was to store home directories centrally. In other words, when a user logs into a client, the home directory should not come from the client’s local disk, but from the central directory on the LDAP server.
For this, we used NFS.
The NFS server was gallien-ldap, and the NFS client was gallien-cl1.
Package installed on gallien-ldap:
- nfs-kernel-server
Package installed on gallien-cl1:
- nfs-common
On the server side, the /home directory was exported to the 192.168.10.0/24 network. On the client side, this directory was mounted as /home.
At first, we encountered a classic problem here: while pam_mkhomedir was active on the client side, the system tried to create the home directory on the NFS share. However, because root_squash was active on the NFS side, the client’s root user could not act as root on the server. This is normal behavior from a security perspective.
As a solution, we created the home directory on the server side:
- mkdir -p /home/testuser
- chown 10000:10000 /home/testuser
- chmod 700 /home/testuser
After that, /home was mounted via NFS on the client.

We also checked the home directory on the server side:

With this structure, the user’s home directory was stored centrally on the LDAP server and used by the client through NFS.
5. gallien-rootca: Our Own Certificate Authority
In the next step, we installed a separate machine named gallien-rootca. The role of this machine was to act as the Root Certificate Authority for the gallien.net environment.
IP address:
- 192.168.10.11
Installed package:
- openssl
On this machine, we first created a private key and then generated our own CA certificate.
The subject information of the Root CA certificate was as follows:
- CN = gallien-ca
- O = gallien

This certificate was later used to sign the SSL certificate used by the DMZ web server.
This approach is a simple example of the PKI concept used in real-world environments. Instead of using a directly self-signed certificate, the web server used a certificate signed by our own CA. This made the structure more organized and manageable.
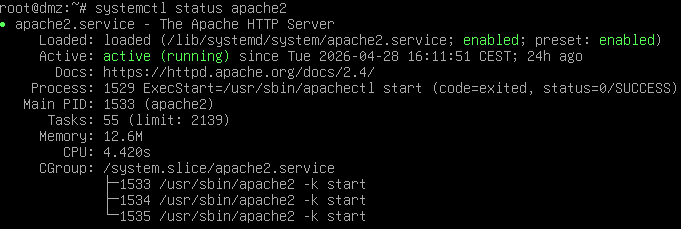
6. DMZ Web Server
The DMZ network was used to separate externally accessible services from the internal networks. In this project, we installed an Apache2 web server inside the DMZ.
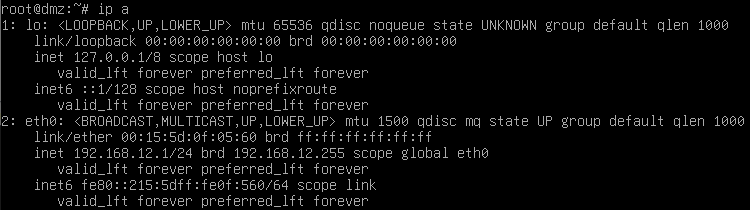
DMZ server information:
- Hostname:
dmz - IP:
192.168.12.1 - Gateway:
192.168.12.254 - DNS:
1.1.1.1
On this machine, Apache2 and OpenSSH were installed:
- apache2
- openssh-server
- openssl
After Apache2 was installed, we created a simple test page:
DMZ Webserver funktioniert
HTTPS Certificate
For the DMZ web server, we first created a private key and a CSR. We sent the CSR file to the gallien-rootca machine. On the Root CA, this CSR was signed, and the dmz.crt certificate was created.
After that, this certificate was copied back to the DMZ server and added to the Apache SSL configuration:
- SSLCertificateFile /etc/ssl/dmz/dmz.crt
- SSLCertificateKeyFile /etc/ssl/dmz/dmz.key
The SSL module was enabled:
- a2enmod ssl
- a2ensite default-ssl
Then Apache was restarted.
For HTTPS testing:
- wget –no-check-certificate -qO- https://192.168.12.1

7. External Access Tests
Thanks to the DNAT rules on the router, access from the external network to the DMZ web server was possible.
The router’s external IP address:
- 10.100.15.104
HTTP test:
- curl http://10.100.15.104

HTTPS test:
- curl -k https://10.100.15.104

We also performed a DNAT test for SSH:
- ssh student@10.100.15.104
This connection did not land on the router. Thanks to DNAT, it was forwarded to the gallien-ldap machine.

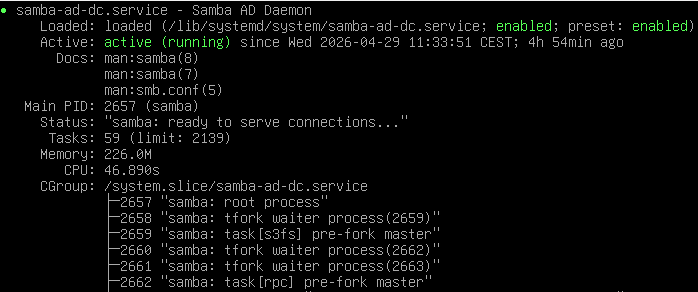
8. obelix.net: Samba Active Directory Domain
After completing the gallien.net side, we moved on to the obelix.net side. This network was designed with a Windows/Active Directory focus.
As the Domain Controller, we installed Samba AD DC on Debian.
Server information:
- Hostname:
obelix-dc - Domain:
obelix.net - IP:
192.168.11.1 - Gateway:
192.168.11.254

Main installed packages:
- samba
- krb5-user
- winbind
- smbclient
- dnsutils
- acl
- attr
The roles of these packages are:
samba: Active Directory Domain Controller servicekrb5-user: Kerberos authentication toolswinbind: Integration with Windows domain user and group informationsmbclient: SMB/CIFS test tooldnsutils: DNS test toolsaclandattr: Filesystem capabilities required for Samba AD
For Samba domain provisioning, we used:
- samba-tool domain provision –use-rfc2307 –interactive
Domain information:
- Realm:
OBELIX.NET - Domain:
OBELIX - DNS Backend:
SAMBA_INTERNAL
After installation, we enabled the samba-ad-dc service.
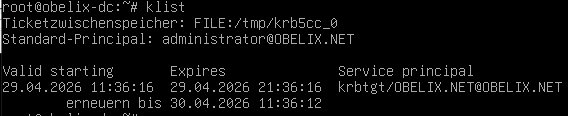
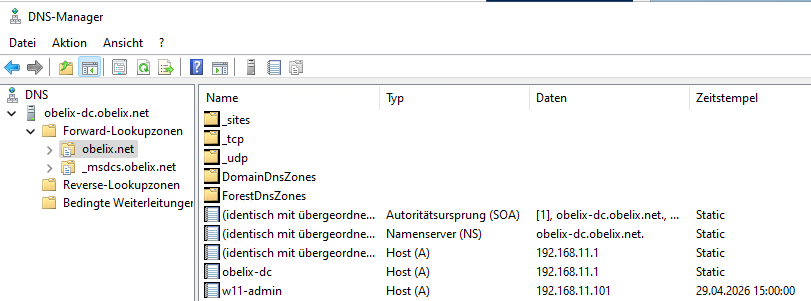
DNS and Kerberos Tests
In an Active Directory environment, DNS is a critical component. Clients use SRV records to find the domain controller. For this reason, we tested the DNS records of obelix.net.
LDAP SRV record:
- host -t SRV _ldap._tcp.obelix.net

On the Kerberos side, we obtained a ticket for Administrator using kinit and checked it with klist.
- kinit administrator
- klist
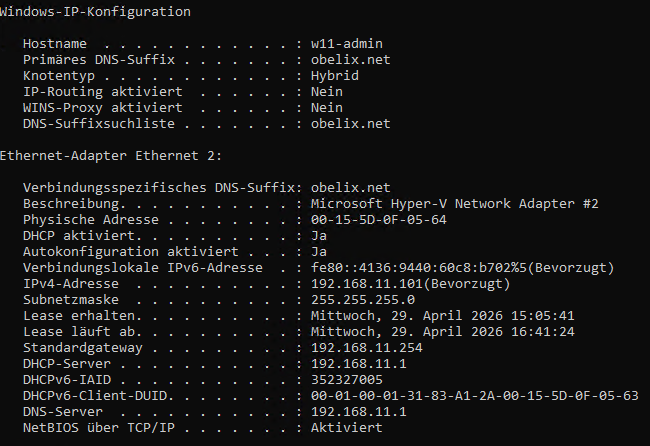
9. W11-Admin: Windows Management Client
To manage the obelix.net domain, we installed a Windows 11-based admin client.
This machine received its IP address from obelix-dc via DHCP:
- IP:
192.168.11.x - Gateway:
192.168.11.254 - DNS:
192.168.11.1 - DNS suffix:
obelix.net
Then we joined the Windows 11 machine to the obelix.net domain.
Domain used:
- obelix.net
User:
- OBELIX\Administrator

After the domain join was successful, the machine was restarted and logged in using a domain user.
RSAT Tools
On Windows, RSAT tools were installed for domain management:
- Active Directory Users and Computers
- DNS Manager
With these tools, the Samba AD domain became manageable through Windows.
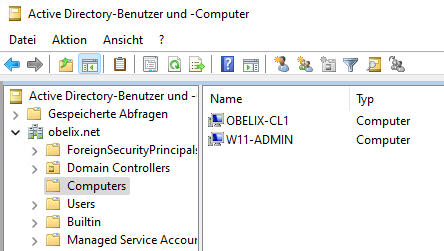
These screens show that Samba AD works compatibly with Windows management tools. This was an important point in terms of Windows/Linux integration in the project.
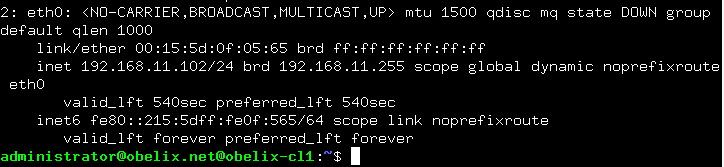
10. obelix-cl1: Joining a Linux Client to the AD Domain
As the final client system in the project, obelix-cl1 was installed. This Debian XFCE-based Linux client received an IP address from DHCP in the obelix.net network.
To join this machine to the Active Directory domain, we used realmd and sssd.
Installed packages:
- realmd
- sssd
- sssd-tools
- libnss-sss
- libpam-sss
- adcli
- samba-common-bin
- oddjob
- oddjob-mkhomedir
- packagekit
The roles of these packages are:
realmd: Simplifies domain discovery and join operations.sssd: Makes AD users available on the Linux system.adcli: Used for Active Directory join operations.libnss-sss: Performs user and group lookups through SSSD.libpam-sss: Uses SSSD/AD during login processes.oddjob-mkhomedir: Creates a home directory when domain users log in.
First, we discovered the domain:
- realm discover obelix.net
Then we joined the domain:
- realm join obelix.net -U Administrator
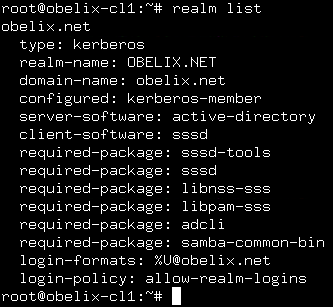
After joining, we checked the result:
- realm list
Finally, we performed a login test with a domain user:
- su – administrator@obelix.net
- pwd

This shows that the Linux client can use Active Directory users. As a result, both Windows and Linux clients were included in the domain structure on the obelix.net side.
11. HTTPS Certificate Check
Finally, we checked the HTTPS certificate of the DMZ web server through the browser.
In the browser, we opened:
- https://10.100.15.104
The DMZ web server responded. In the certificate details, we saw:
- CN:
dmz - Issuer:
gallien-ca
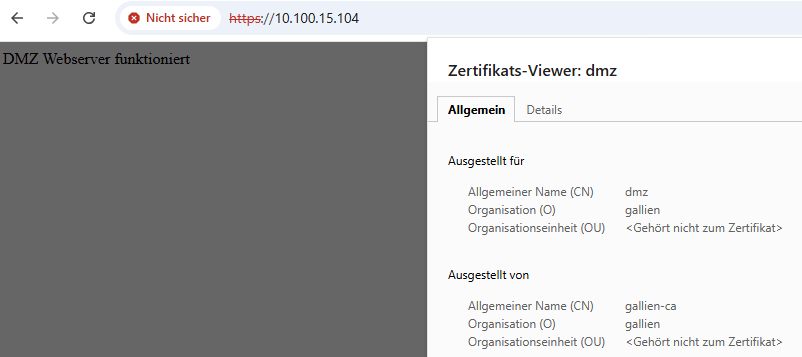
Seeing the “Not secure” warning in the browser was normal. This was because the gallien-ca certificate we created had not yet been imported into Windows’ Trusted Root Certification Authorities store. If gallien-ca.crt is added to Windows as a trusted root certificate, this warning disappears.
Virtual Machines Used in the Project
The following virtual machines were used in this project:

Router
A Debian machine responsible for central routing, NAT, and DNAT operations.
Tasks:
- Routing between network segments
- NAT/PAT
- DNAT
- Gateway functions
gallien-ldap
The central server of the Linux infrastructure.
Tasks:
- DHCP
- DNS
- LDAP
- NFS
gallien-cl1
Linux client using LDAP.
Tasks:
- Receiving an IP address via DHCP
- LDAP authentication
- Using NFS home directory
gallien-rootca
Certificate Authority.
Tasks:
- Creating the Root CA
- Signing the DMZ web server certificate
dmz
Externally accessible web server.
Tasks:
- Apache2
- HTTP/HTTPS publishing
- SSL certificate usage
obelix-dc
Samba Active Directory Domain Controller.
Tasks:
- AD Domain Controller
- DNS
- Kerberos
- DHCP
W11-Admin
Windows management client.
Tasks:
- Domain join
- AD management with RSAT
- DNS management
obelix-cl1
Linux AD client.
Tasks:
- Receiving an IP address via DHCP
- AD domain join
- Login with an AD user
Problems Encountered and Solutions
We also encountered some typical but educational problems during this project.
DNS Resolution Problem
At first, apt update did not work on some machines. Pinging by IP address worked, but domain names could not be resolved. This showed us that the problem was not the internet connection, but DNS.
As a solution, the correct DNS servers were added to /etc/resolv.conf.
LDAP Client Home Directory Problem
When logging in with an LDAP user, we received an error because the home directory did not exist. As an initial solution, we used pam_mkhomedir. However, after switching to NFS, the client side tried to create the directory on the NFS share and received a permission denied error because of root_squash.
Solution:
- Create the home directory on the server side
- Assign the correct UID/GID ownership
- Use NFS mount on the client
Samba AD DNS Problem
After the Samba AD installation, the host -t SRV tests did not work at first. The reason was that obelix-dc was using an external DNS server. An AD DC must use its own DNS.
Solution:
- nameserver 127.0.0.1
was configured.
SSH Host Key Warning
After DNAT, when connecting via SSH through the external IP, we received the warning “REMOTE HOST IDENTIFICATION HAS CHANGED”. The reason was that a different SSH host key had previously been saved for the same IP address.
Solution:
- ssh-keygen -f ~/.ssh/known_hosts -R 10.100.15.104
The old record was removed with this command.
General Evaluation
This project was more than just a simple “install a few servers” exercise. Multiple network segments, two different domain models, Linux and Windows services, central user management, certificate infrastructure, and external access were all implemented together.
The following topics were especially reinforced in practice:
- IP planning
- Routing
- NAT and DNAT
- DHCP configuration
- DNS forward/reverse zone logic
- LDAP user management
- PAM/NSS integration
- Central NFS home directory
- Samba Active Directory
- Kerberos authentication
- Windows RSAT management
- Linux client domain join
- HTTPS certificate usage
- DMZ concept
This structure can be considered a lab implementation of a small-scale enterprise network.
Conclusion
At the end of the project, the following goals were achieved:
- The gallien.net Linux infrastructure was successfully built.
- Central user management was provided with LDAP.
- gallien-cl1 was able to log in with an LDAP user.
- Home directories were centralized through NFS.
- A custom certificate authority was created with gallien-rootca.
- Apache2 served HTTP/HTTPS in the DMZ.
- NAT and DNAT worked on the router.
- The DMZ web server was accessible from the external network via HTTP/HTTPS.
- gallien-ldap was reachable from the external network via SSH through DNAT.
- The obelix.net Samba AD domain was created.
- The Windows 11 client was joined to the domain.
- Domain management was performed with RSAT.
- The Linux client was also joined to the obelix.net domain.
Thanks to this project, many fundamental system administration topics were applied on both the Linux and Windows sides. Especially the combination of DNS, DHCP, LDAP, Kerberos, Samba AD, NFS, and iptables provided an experience very close to real-world network infrastructures.
In short, this project became a comprehensive network setup in which two separate domain structures communicate through a central router, external access is provided through a DMZ, and central user management and certificate infrastructure are implemented.