Sharing notes from my ongoing learning journey — what I build, break and understand along the way.
My First Infrastructure as Code Experiment on SAP BTP with Terraform
Creating an SAP BTP Subaccount, Cloud Foundry Environment and Space with Terraform
In this post, I used Terraform to perform a small Infrastructure as Code experiment on SAP Business Technology Platform. My goal was not to build a large and complex enterprise setup, but to understand step by step how Terraform works in the context of SAP BTP Administration.
In this lab, I completed the following steps:
1. Logging in with the SAP BTP CLI
2. Creating a Terraform project
3. Using the SAP BTP Terraform provider
4. Creating a new subaccount with Terraform
5. Verifying the created subaccount in the SAP BTP Cockpit
6. Understanding the Terraform state concept
7. Creating a Cloud Foundry environment
8. Adding the Cloud Foundry provider
9. Creating a Cloud Foundry space
This exercise was especially useful for understanding account models, environments, entitlements, Cloud Foundry and Terraform while preparing for SAP BTP Administration topics.
1. Logging in with the SAP BTP CLI
First, I logged in to my global account using the SAP BTP CLI.
In PowerShell, I ran the following command:
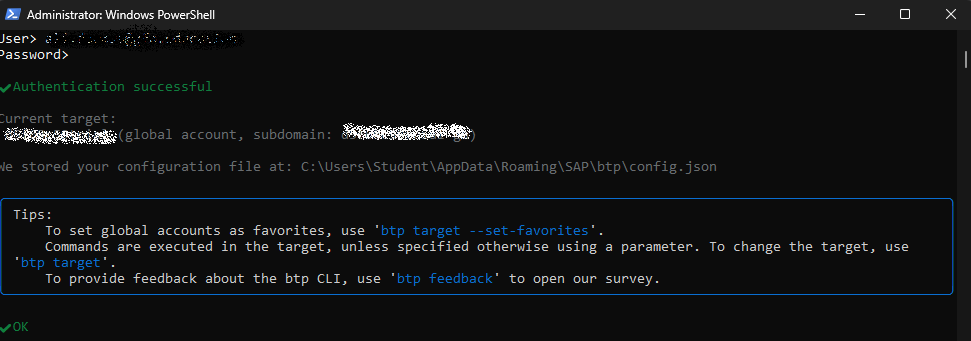
btp loginAfter entering my SAP BTP credentials, the login was successful.
The CLI returned an output similar to this:
Authentication successful

Current target:
global account, subdomain: ...
This step was important because before working with Terraform, I wanted to make sure that my SAP BTP CLI was connected to the correct global account.
2. Preparing the Terraform Project Folder
Next, I created a new Terraform working directory on Windows.
cd C:\
mkdir btp-terraform-lab
cd btp-terraform-lab
Inside this folder, I started creating the Terraform configuration files.
At the beginning, I used three basic files:
providers.tf
variables.tf
terraform.tfvars
The folder structure looked like this:
C:\btp-terraform-lab
├── providers.tf
├── variables.tf
└── terraform.tfvars
3. Defining the SAP BTP Provider
First, I defined the SAP BTP provider in the providers.tf file.
terraform {
  required_providers {
    btp = {
      source = "SAP/btp"
    }
  }
}

provider "btp" {
  globalaccount = var.globalaccount
}
With this file, I told Terraform the following:
This project will use the SAP BTP provider.
The global account information will be taken from a variable.
I did not hardcode the globalaccount value directly into the provider configuration. Instead, I used a variable. This makes the configuration cleaner and easier to reuse.
In the variables.tf file, I defined the variable:
variable "globalaccount" {
  description = "SAP BTP Global Account subdomain"
  type        = string
}
In the terraform.tfvars file, I provided the actual global account subdomain value:
globalaccount = "GLOBAL_ACCOUNT_SUBDOMAIN"4. Running Terraform Init and Validate
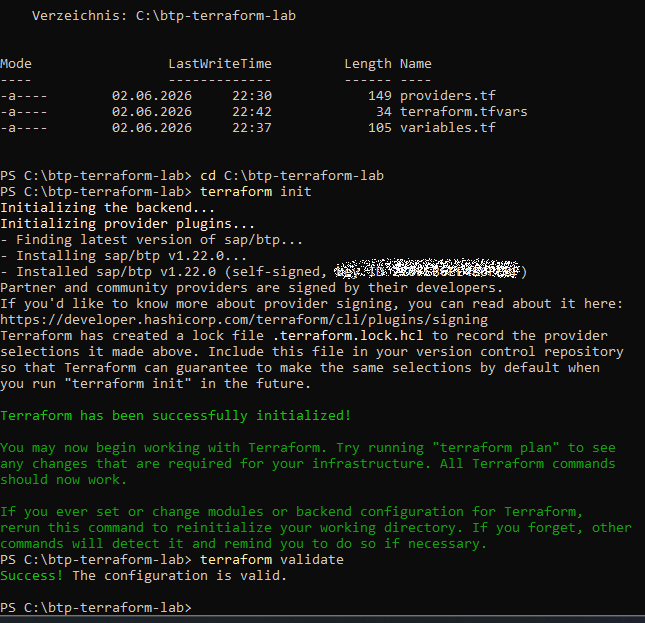
After preparing the files, I ran the following command to initialize Terraform and download the required provider:
terraform initThis command downloaded the SAP BTP provider and prepared the Terraform working directory.
The successful output included the following message:
Terraform has been successfully initialized!Then I checked whether the configuration was valid:
terraform validateThe result was successful:
Success! The configuration is valid.At this stage, no resources had been created in SAP BTP yet. I only verified that the Terraform configuration files were written correctly.
5. Planning the First Subaccount with Terraform
Next, I defined the first real resource in the main.tf file: a new SAP BTP subaccount.
resource "btp_subaccount" "tf_sandbox" {
  name      = "00-eu-core-tf-sandbox"
  subdomain = "00-eu-core-tf-sandbox-example"
  region    = "us10"
}
Here, the following line:
resource "btp_subaccount" "tf_sandbox"means:
Terraform will manage an SAP BTP subaccount resource.
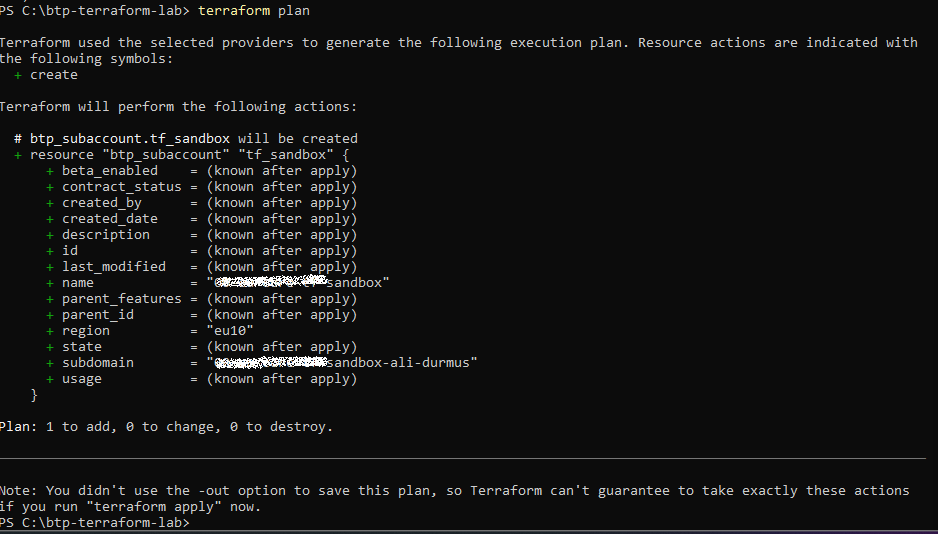
Inside Terraform, this resource will be named tf_sandbox.Then I ran the terraform plan command:
terraform planTerraform showed me what it was planning to do:
Plan: 1 to add, 0 to change, 0 to destroy.This output means:
1 new resource will be created.
No existing resources will be changed.
No resources will be destroyed.
At this point, nothing had been created yet. I only reviewed the execution plan.
6. Creating the Subaccount with Terraform Apply
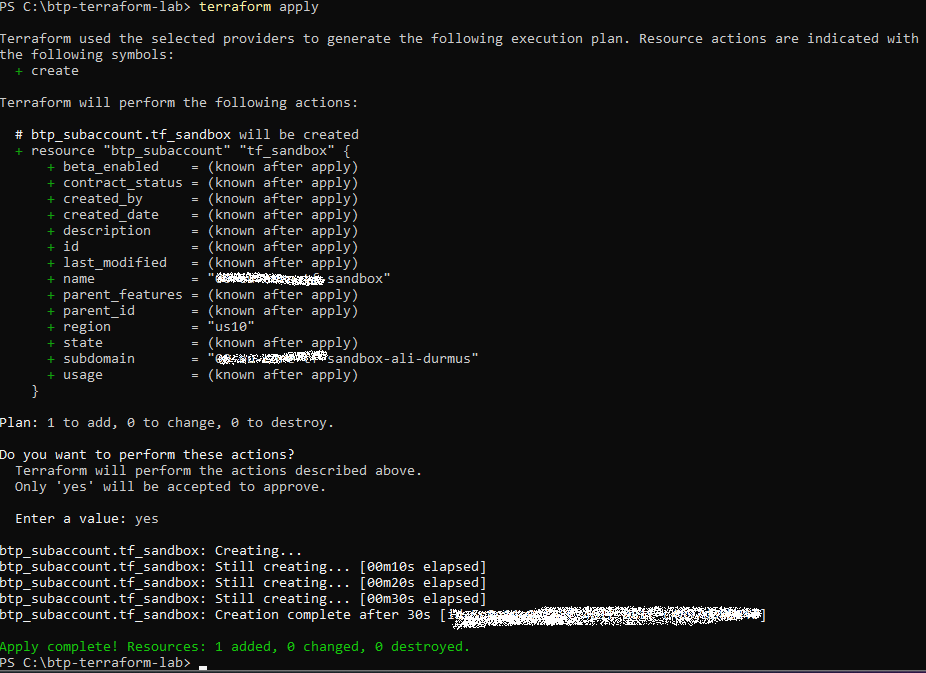
After reviewing the plan, I started the actual creation process:
terraform applyTerraform showed the plan again and asked for confirmation:
Do you want to perform these actions?
Enter a value:
I confirmed the operation by typing:
yesAfter the creation was complete, Terraform returned the following output:
Apply complete! Resources: 1 added, 0 changed, 0 destroyed.This means that Terraform successfully created a new subaccount in SAP BTP.
7. Verifying the Subaccount in the SAP BTP Cockpit
After that, I opened the SAP BTP Cockpit and checked whether the new subaccount had actually been created.
Under the global account, the new subaccount was visible:
00-eu-core-tf-sandboxAt this point, the new Terraform-created sandbox subaccount appeared next to the existing manually created DEV / TEST / PROD structure.
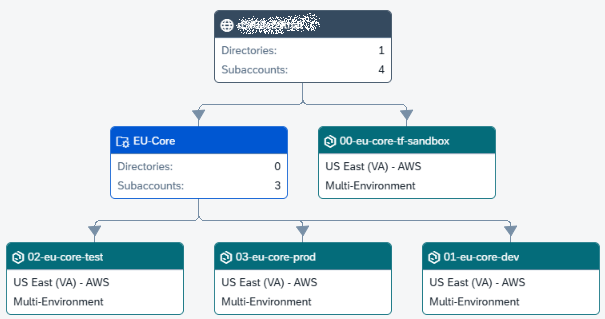
When I opened the subaccount, I could also see its general information:
Subdomain
Tenant ID
Subaccount ID
Region
Provider
Environment
Created On
Modified On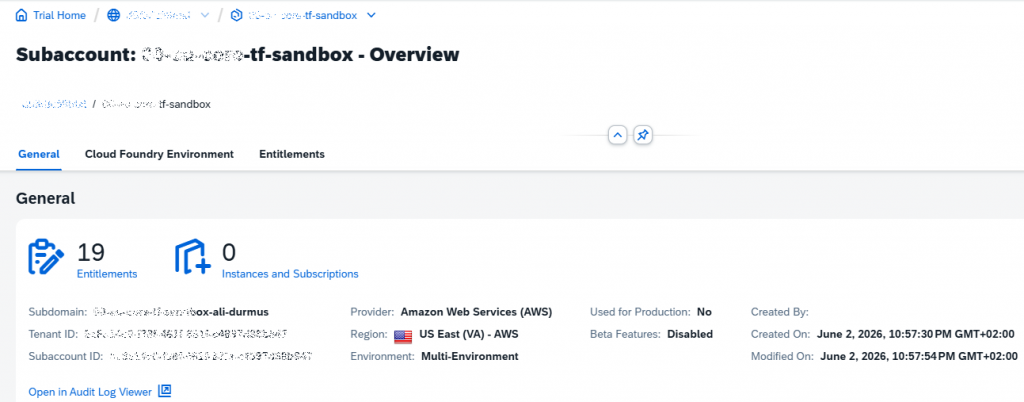
8. Checking the Terraform State
To check whether Terraform was tracking the created resource in its state, I ran the following command:
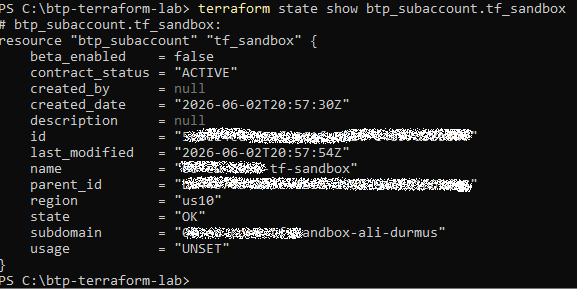
terraform state show btp_subaccount.tf_sandboxThis command showed details of the created subaccount:
name      = "00-eu-core-tf-sandbox"
region    = "us10"
state     = "OK"
subdomain = "..."
With this step, I saw the Terraform state concept in practice.
Terraform state is the structure Terraform uses to track which resources it manages. In other words, Terraform now knows that this subaccount was created and is managed by Terraform.
9. Creating the Cloud Foundry Environment
After the subaccount had been created, the next step was to create a Cloud Foundry environment.
I added a second resource block to the main.tf file:
resource "btp_subaccount_environment_instance" "cloudfoundry" {
  subaccount_id    = btp_subaccount.tf_sandbox.id
  name             = "00-eu-core-tf-sandbox"
  landscape_label  = "cf-us10-001"
  environment_type = "cloudfoundry"
  service_name     = "cloudfoundry"
  plan_name        = "trial"

  parameters = jsonencode({
    instance_name = "00-eu-core-tf-sandbox"
  })
}
The most important line here was:
subaccount_id = btp_subaccount.tf_sandbox.idWith this line, Terraform created the Cloud Foundry environment inside the subaccount that had just been created by Terraform.
When I ran terraform apply again, Terraform planned to create only the Cloud Foundry environment instance:
Plan: 1 to add, 0 to change, 0 to destroy.After confirming the operation, it completed successfully:
Apply complete! Resources: 1 added, 0 changed, 0 destroyed.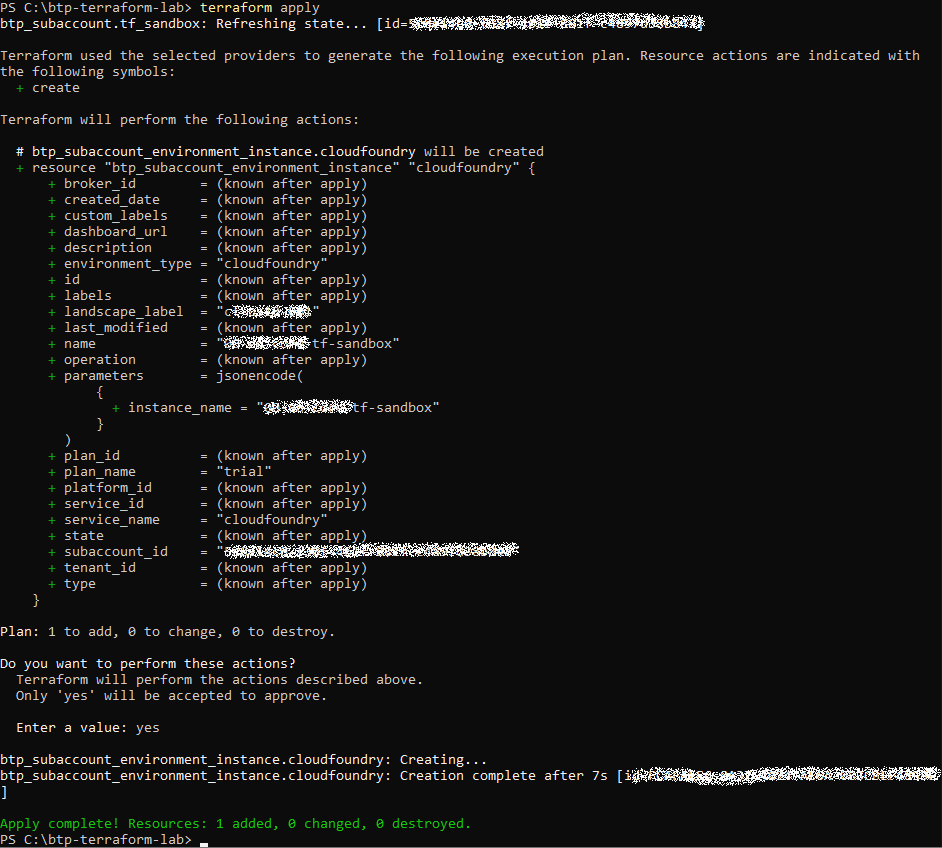
10. Verifying the Cloud Foundry Environment in the Cockpit
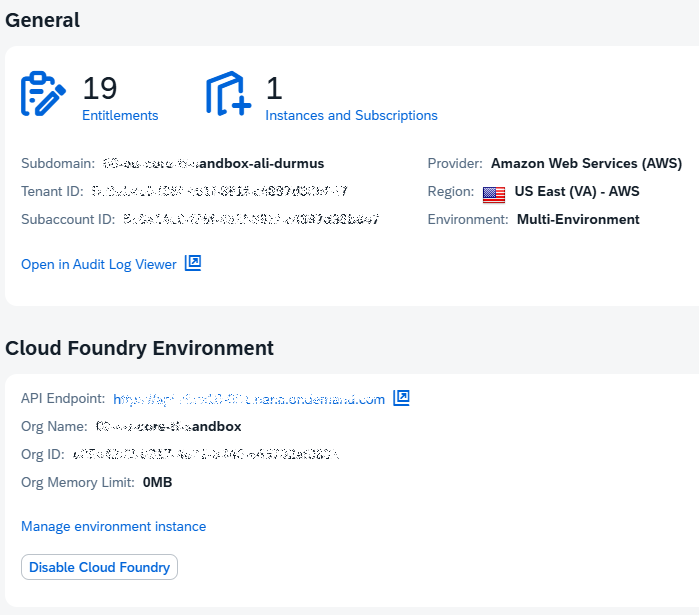
I then checked the subaccount again in the SAP BTP Cockpit and saw that the Cloud Foundry Environment section had been created.
The following information was visible:
API Endpoint
Org Name
Org ID
Org Memory Limit
At this point, the Cloud Foundry environment had been created successfully.
However, there was one important observation:
Org Memory Limit: 0MBThis means that even though the Cloud Foundry environment had been created, the memory limit still needs to be reviewed before deploying applications.
11. Adding the Cloud Foundry Provider
After creating the Cloud Foundry environment, I wanted to manage resources inside Cloud Foundry, such as spaces.
Here, an important distinction became clear:
SAP BTP Provider:
- Subaccounts
- Environment instances
- Entitlements
- Subscriptions

Cloud Foundry Provider:
- Spaces
- Service instances
- Routes
- Applications
For this reason, I added the Cloud Foundry provider to the providers.tf file:
terraform {
  required_providers {
    btp = {
      source = "SAP/btp"
    }

    cloudfoundry = {
      source = "cloudfoundry/cloudfoundry"
    }
  }
}

provider "btp" {
  globalaccount = var.globalaccount
}

provider "cloudfoundry" {
  api_url = "https://api.cf.us10-001.hana.ondemand.com"
}
I took the api_url value directly from the Cloud Foundry Environment screen in the SAP BTP Cockpit.
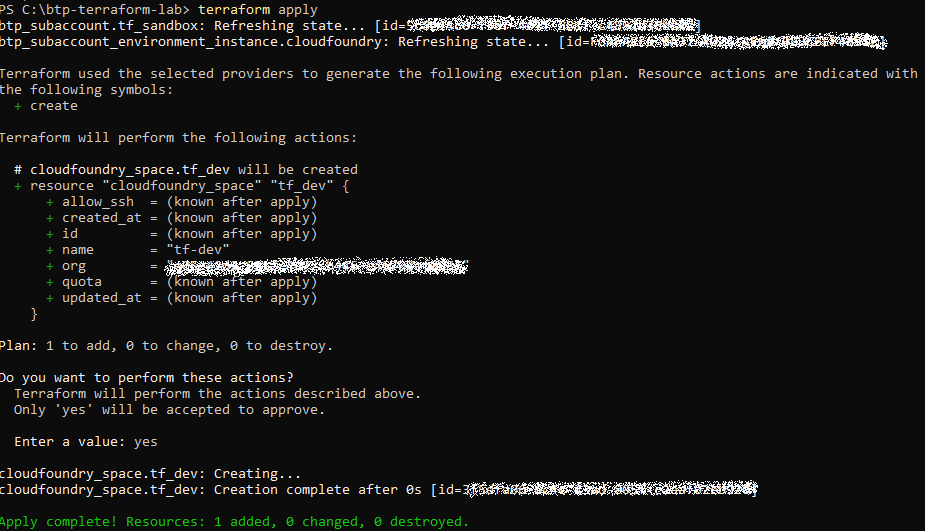
12. Creating a Cloud Foundry Space
Finally, I created a Cloud Foundry space with Terraform.
I added the following resource block to the main.tf file:
resource "cloudfoundry_space" "tf_dev" {
  name = "tf-dev"
  org  = btp_subaccount_environment_instance.cloudfoundry.platform_id
}
Here:
name = "tf-dev"defines the name of the space to be created.
The following line:
org = btp_subaccount_environment_instance.cloudfoundry.platform_idtells Terraform to create this space inside the Cloud Foundry org created through the Cloud Foundry environment instance.
During the first attempt, I received an error related to authorization and the API endpoint. After that, I used the correct values for the Cloud Foundry provider:
CF API URL
CF USER
CF ORIGIN
CF PASSWORD
The origin value was especially important. In the SAP BTP Cockpit, the user origin was shown as sap.ids. Therefore, the Cloud Foundry operation also needed to use the same origin.
After correcting these values, terraform apply completed successfully:
Apply complete! Resources: 1 added, 0 changed, 0 destroyed.With this, the tf-dev Cloud Foundry space was created by Terraform.
13. Final Structure of the Terraform Lab
At the end of this exercise, the following structure was created with Terraform:
SAP BTP Global Account
└── Subaccount: 00-eu-core-tf-sandbox
    ├── Region: us10
    ├── Cloud Foundry Environment
    │   ├── API Endpoint: https://api.cf.us10-001.hana.ondemand.com
    │   ├── Org Name: 00-eu-core-tf-sandbox
    │   └── Org Memory Limit: 0MB
    │
    └── Space: tf-dev
The Terraform state now manages the following resources:
btp_subaccount.tf_sandbox
btp_subaccount_environment_instance.cloudfoundry
cloudfoundry_space.tf_dev
14. What I Learned from This Exercise
This practice helped me understand several important SAP BTP Administration and Terraform concepts.
First, I saw the difference between plan and apply in Terraform:
terraform plan
→ Shows what Terraform is going to do.

terraform apply
→ Actually applies the changes.
Second, I saw the Terraform state concept in practice:
terraform state list
→ Lists the resources managed by Terraform.

terraform state show
→ Shows the details of a specific resource.
Third, I learned the difference between the SAP BTP Provider and the Cloud Foundry Provider:
SAP BTP Provider:
Manages BTP-level resources such as subaccounts and environment instances.

Cloud Foundry Provider:
Manages Cloud Foundry resources such as spaces inside an org.
Fourth, I learned that being a BTP administrator is not always enough for Cloud Foundry operations. The correct API endpoint, user, origin and org role are also required.
15. Conclusion
This exercise was my first serious hands-on practice with Terraform in the context of SAP BTP Administration.
In addition to the structures I had previously created manually in the SAP BTP Cockpit, I was now able to create the following resources with Terraform:
Subaccount
Cloud Foundry Environment
Cloud Foundry Space
The next logical steps after this point are:
1. Create a space quota
2. Assign the quota to the space
3. Create a Destination service instance
4. Create a Connectivity service instance
5. Create an XSUAA service instance
6. Make the Terraform code more modular
Although this exercise may look small, it is an important step for SAP BTP platform administration. The setup is no longer only based on manual ClickOps. It is starting to move toward an Infrastructure as Code approach.